We make use of cookies to a small extent. However we also play videos
hosted on Youtube and Vimeo who add their cookies.
Copyright is standard "all rights reserved" unless otherwise labelled.
More Details: Page:
Cookies Privacy and Copyright

This article is licensed under a
Creative Commons Attribution 4.0 International License.
You may quote and use on condition
that you attribute John Calder as the source of this info.
HOWTO
capture with "VLC" from Canon HV20 High Definition Video Camera
28 June 2007
.
VLC is an
open source package downloadable from:
http://www.videolan.org
There is no camera transport control so cue up the tape
manually.
Then
Menu:File � Open Capture Device
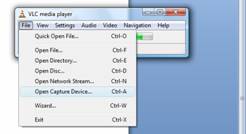
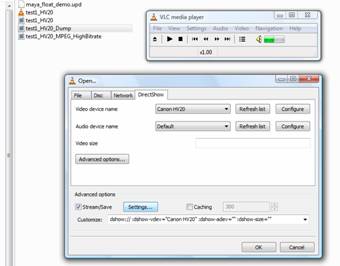
In the "DirectShow" Tab
Open the Dropdown list "Video Device Name" and select your Camcorder.
If it does not appear then click on
"Refresh List" then look again. You may need to
do this twice.
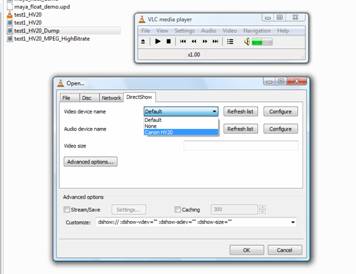
You do not need to take any action
regarding "Audio Device". In the case of video cameras, the "Video Device"
delivers both Video and Audio.
Check the checkbox "Stream/Save" then click on "Settings"
Checkbox "File" then "Browse" to give a file name for your
captured video.
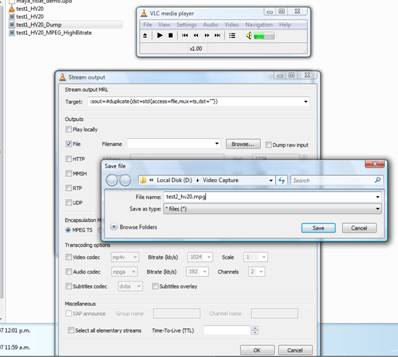
Check the box "Dump raw input" then click "OK"
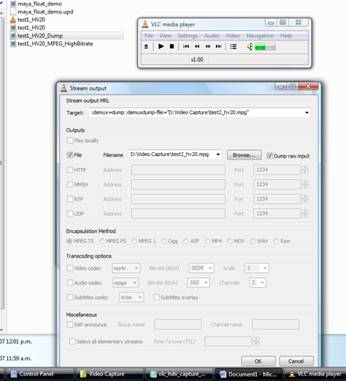
This will return you to the "Directshow"
form
Make sure your video is cued up, paused and
ready to roll.
Click OK again and start the video running
on the camera.
There is NO INDICATION of anything
happening while you are capturing.
STOP the video on the camera.
In my experiments I have been waiting about
5 sec then I close the VNC program.
I do not know yet if I need to do this but with there being nothing in the way
of progress indicators,
I wanted to make sure that the capture is ending.
Hover the mouse over your capture file to
check that it is ready.
While still processing the system reports "0 bytes"

After some time (10 sec to 2 minutes
depending on size, the weather, I can not see a definite pattern yet!) you will
find that the file is there and is of an expected size.
The file is now ready for use with your video editing software.
